


New Making
Building a fine violin begins with careful wood selection. I use wood that I\\'ve bought and then stored for many years, including Bosnian maple; North American red, curly, and bigleaf maple; Alpine spruce; and Engleman spruce. Over the years I\\'ve developed a good sense of the acoustic potential of various pieces of wood. I also use computer-assisted acoustical analysis which enables me to quantify the wood\\'s tonal characteristics. Different types and cuts of wood have a profound effect on outcome, and I choose woods according to how I want the finished violin to sound (and look).Wood selection goes hand in hand with my choice of model for the violin. Again, different models bring different qualities to an instrument, both visual and acoustic. I enjoy working with a variety of traditional models in addition to some of my own.
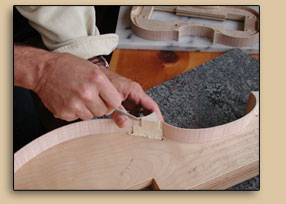
Once these decisions have been made I begin building the violin. I first build the rib cage and then transfer its outline to the pieces for the back and top. These are then cut out and the arching of the plates is begun. For me this is the most exciting part of building a violin. When arching the top and back plates of an instrument – first with gouges, then finger planes, and finally with a scraper – I\\'m sculpting both sight and sound; here visual and aural beauty are inseparable.
After the arching of the plates is finished I turn them over and hollow them out, but not to finished thickness. The plates are then temporarily glued to the rib cage, the outline is finished following the ribs, the purfling set in, the channel cut, and the arching finished. I then remove the plates and cut the f-holes and round the plate edges.
Now it\\'s time to graduate the plates. As I graduate a plate, I meticulously monitor its weight, stiffnesses, resonant frequencies (tap tones), and their shapes. When the top is finished the bass bar is put in and shaped, and the tap tones are checked again. I then glue the finished back to the rib cage, remove the internal mold, clean things up, and glue the top on.
Next I carve the scroll, shape the fingerboard, and set and shape the neck. Then I set up the instrument "in the white" before varnishing, and I play it. I also run further acoustical tests. These data and all those collected while building provide me with an informational base which adds hard numbers to my intuitive process and enables me to better predict outcome as I begin each new instrument.
The varnish process follows: First comes ground preparation, then the ground, and then several coats of varnish.
Final set-up is the last part of building a violin. Everything influences everything: string choice, tailpiece (weight and placement), and bridge choice and shaping (the bridge transmits string vibrations to the body of the violin, acts as a filter, and radiates sound in a specific frequency range itself).
For me the instrument isn\\'t finished until someone owns and loves it. As a violin maker I only do part of the job. It\\'s the musician who brings the instrument to life and enables it to reach its full potential.
The current prices for my instruments are:
Violins: $25,000
Violas: $25,000
Cellos: $50,000
Antiquing: add $1,000 - $2,500.
California residents add 9.5% sales tax.
Additional
Web design by Palmer Media. Please contact us with any comments or problems related to this site.
Copyright © 2003-2010 Anthony Lane